
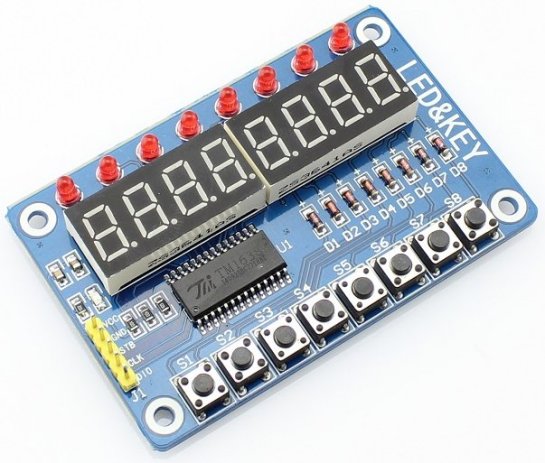
While looking for a new display on eBay recently I stumbled across a seven segment display module. The module (shown below) features 8 seven segment displays, 8 push button switches as well as 8 LEDs. All of which are controlled by one single driver IC the TM1638. I have never come across the TM1638 before, I have used similar display driver ICs like the MAX7219, but never the TM1638.
After some googling I discovered the TM1638 is manufactured by a Chinese outfit known as Titan Micro Electronics. After downloading the data sheet I begun looking to see how this driver is used. At this point I must state the data sheet, which appears to have been translated from chinese to english, badly, leaves a lot to be desired. Fortunately for me the Arduino fanboys seem to love these devices and there is no shortage of information scattered across the internet. So armed with this information I decided to purchase one.
Once it had arrived getting it working was fairly straight forward. The module does not come with schematic and I wasn’t going to bother reverse engineering the board to create one (not unless I ran into any issues I could not resolve) so it was a bit trial and error in the early stages. In the rest of the post I will demonstrate how to use this device in more detail.
Background
The TM1638 is a LED driver controller with integrated key-scan interface. Communication with the device is via a 3 wire serial interface. The device is capable to of driving up to 8 x 10 LED segments. As well as reading 24 individual key inputs. The display intensity of the LED segments can also be dynamically configured.
Connections
The supply voltage for the device is quoted as 5V ±10% however have seen evidence of people using a 3V3 supply and not having issues.
The LED segments are connected to the device via the segment output pins SEG1-SEG10 and grid output pins GRID1-GRID8. The module I purchased has 8 seven segment displays and a further 8 LEDs. These seven segment displays connect via segment output pins SEG1-SEG8 and grid output pins GRID1-GRID8. The 8 LEDs connect via segment output pin SEG9 and grid output pins GRID1-GRID8.
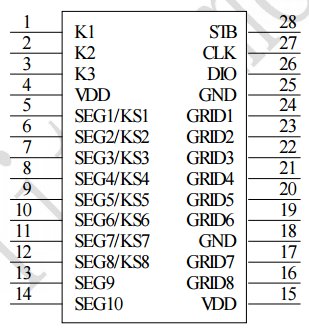
The push button switches are multiplexed together and read via key state output pins KS1-KS8 and key scan data input pins K1-K3. Note key state output pins KS1-KS8 share the same physical pins as the segment output pins SEG1-SEG8. The device simply alternates between driving the segment outputs and scanning the key input states.
Communication with the device is via a 3 wire serial interface comprising of a strobe (STB), data input/output (DIO) and a clock (CLK) pin. The strobe pin is used to initialise the serial interface prior to sending data. The state of the DIO pin is clocked into the device on the rising edge of the clock signal. Similarly when reading from the device the state of DIO pin may be read on the rising edge of the clock signal.

Operation
The protocol used to communicate with the TM1638 is a fairly simple one. The transfer is initialised by first pulling the strobe line low, a command byte is then sent followed by a number of optional arguments. The transfer is then terminated by returning the strobe pin high. Each command sent must begin with the strobe pin being pulled low and finish with the strobe pin being pulled high.
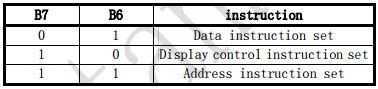
The device supports three command types. Determined by bits B7 and B6 of the command byte. Data instruction set 0b01 (0x4X) writes or reads data to or from the device. Display control instruction set 0b10 (0x8X) configures the device and Address instruction set 0b11 (0xCX) sets the display register address.
The first thing we want to do post power up is initialise the display. To do so we need to send the display control instruction set command 0x8X.
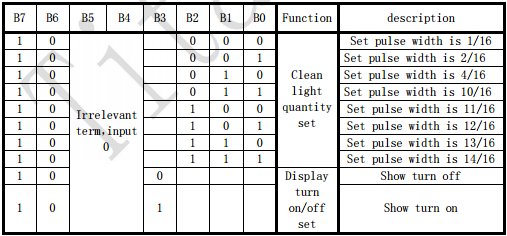
The table above shows the individual bit settings for this command and their relevant function. Bits B7 and B6 set the command type, fixed at 0b10 (0x8X). Bits B5 and B4 are irrelevant and set to 0b00. Bit B3 is used to turn the display ON (1) or OFF (0). The remaining bits B2, B1 and B0 configure the display intensity. They actually set the pulse width which determines the display intensity. 1/16 (0x00) being the dullest and 14/16 (0x07) being the brightest.
For instance if we wanted to turn the display ON with the intensity set to maximum we would send the command 0b10001111 (0x8F). For minimum intensity we would send the command 0b10001000 (0x88).
The data instruction set command can perform a number of functions. We can set the data write mode to either write data to a data register or read the key scan data. We can set the address add mode to either automatically increment the destination address while writing data or write to a fixed destination address. There is also a test mode set function which we will not cover here.

Bits B7 and B6 set the command type and are fixed at 0b01 (0x4X). Bits B5 and B4 are irrelevant and set to 0b00. Bit B3 is used to set the test mode which we will keep set to 0 normal mode. Bit B2 sets the address add mode (0 automatically increments the address and 1 sets a fixed address). Bits B1 and B0 set the data write mode to be either a write to a data register (0b00) or read from the key scan data register (0b10).
The address instruction set command configures the destination address/register we wish to write. There are 16 display registers in total. Bits B7 and B6 set the command type and are fixed at 0b11 (0xCX). Bits B5 and B4 are irrelevant and set to 0b00. The remaining bits B3, B2, B1 and B0 set the display address (0x00 through 0x0F). The data stored in these registers is used to drive the display segments. Which we will cover in more detail soon.
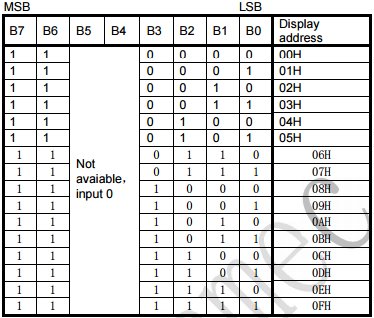
This may all look very confusing so let’s cover a couple of examples which should make things a little clearer. Let’s say we want to send the value 0x45 to display register 0x02. The address mode will be fixed since we are only writing one register. So we send the command 0x44 (0b01000100) followed by command 0xC2 (0b11000010) followed by 0x45. If we wanted to send the values 0x01, 0x02 and 0x03 to display registers 0x00, 0x01 and 0x02. The address mode will be set to auto increment since we are writing consecutive registers. We would then send the command 0x40 (0b01000000) followed by command 0xC0 followed by 0x01, 0x02 and 0x03.
To read the state of the keys we need to send the command 0x42 (0b01000010) before reading back 4 bytes containing the key states. The details of which we will cover in more detail further on.
As already mentioned the display registers allow us to set all of the individual segment states. The mapping of each segment in the display registers can be seen in the table below.

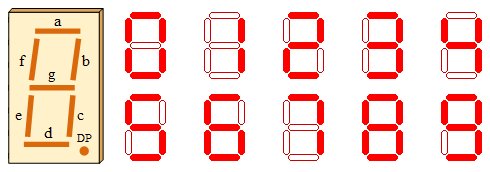
For instance segment output pins SEG1-SEG8 which control the seven segments (A-G) plus the decimal point (DP) on grid output pin GRID1 are mapped to display register 00HL (the lower 4 bits of the display register 0) and 00HU (the upper 4 bits of the display register 0). The remaining two segment output pins SEG9 and SEG10 are mapped to the lower two bits of display register 01HL. The remaining bits of display register 1 have no function. This is then repeated for digit 2 using registers 02HL/02HU and 03HL/03HU etc.
The module I have has single LEDs all connected to segment output pin SEG9 and no connections to segment output pin SEG10. Some of the modules available on eBay have bi-colour LEDs on which I assume SEG9 is used to drive one colour and SEG10 to drive the other.
Again this may appear somewhat confusing so let’s have another example. Let’s say we wanted to show ‘0’ on display digit 1. In order to show ‘0’ we need to set segments SEG1 (a), SEG2 (b), SEG3 (c), SEG4 (d), SEG5 (e) and SEG6 (f) while segments SEG7 (g) and SEG8 (DP) remain unset. We do this by loading display register 0 with the value 0b00111111 (0x3F). For display digit 2 we load display register 2 with 0b00111111 (0x3F) etc.
Similarly if we wanted to energise the LED1 we would need to set SEG9 by loading display register 1 with 0b0000001 (0x01). For the LED2 we would load display register 3 with 0b0000001 (0x01) etc.
When it comes to reading the input keys. A maximum of 24 keys may be read by the device. These are all arranged in a 3×8 matrix format. The key states returned from the read key scan data command as four bytes encoded as follows.

BYTE1 contains the key input states K3 (B0), K2 (B1) and K1 (B2) for key state output KS1 and K3 (B4), K2 (B5) and K1 (B6) for key state output KS2. BYTE2 corresponds to key state outputs KS3 and KS4. BYTE 3 corresponds to key state outputs KS5 and KS6 and BYTE4 corresponds to key state outputs KS7 and KS8. Bits B3 and B7 in all four bytes are irrelevant and are ignored.
For example to read the input state of the key corresponding to input state K2 and key state output KS8 we read bit B5 of BYTE4. To read the input state of the key corresponding to input state K3 and key state output KS1 we read bit B0 of BYTE1.
After a bit of trial and error I discovered the eight keys on my board are all mapped to input state K3. So by checking bits B0 and B4 of each of the 4 bytes read I was able to determine the state of all of the 8 keys.
I have created a basic driver for the TM1638 (written in C) using Atmel Studio. The driver has been tested on a ATMega328 (Arduino Nano) development board. However the code could easily be ported to any other platform if required. All of the project files and an example implementation are all available on my GitHub account.
