
My new wireless router decided to stop working at the weekend. It has been behaving rather strange for the past few days. I’ve tried power cycling in the vain hope a reboot may fix the issue. Which it didn’t. And to make things worse now it wont even boot. Pinging it gets no response either. The original firmware was replaced with DD WRT, a great Linux alternative firmware, so the first thing I did was head over to the DD WRT homepage for help. I tried the recommended 30/30/30 reset procedure which didn’t solve the issue.
Luckily there is a ton of resources out there surrounding these routers. Once such resource I found extremely useful was the OpenWRT Wiki page. Apparently the WDR4300 has an Atheros AR9344 SOC running at 560 MHz with 8MB of flash and 128 MB DRAM. It also has both a JTAG and serial programming/debug connection. The flash memory is made up of the boot loader (U-Boot), the operating firmware and the ART (which contains MAC addresses and calibration data for the wifi). It’s also the boot loaders responsibility for configuring the serial interface.
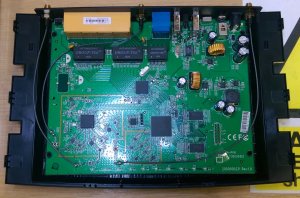 With nothing to lose I begun disassembling the router to see if I could get access to this serial port and maybe diagnose the problem. After removing the aerials and the screws holding the case together I had the router disassembled. There are two unpopulated headers one 14 pin, which I assume must be the JTAG connection, and one 4 pin which turns out to be the serial connection. The four pins comprising the two supply lines and the TX and RX lines. I soldered in a pin header to the board and connected my USB to serial converter. The connection settings according to the OpenWRT Wiki page are 115200 8N1 with no flow control. Using puTTY I managed to capture the routers output during power up.
 U-Boot 1.1.4 (Apr 25 2012 - 18:29:12)
 U-boot DB120
 DRAM: 128 MB
 id read 0x100000ff
 flash size 8MB, sector count = 128
 Flash: 8 MB
 Using default environment
 In: serial
 Out: serial
 Err: serial
 Net: ag934x_enet_initialize...
 No valid address in Flash. Using fixed address
 wasp reset mask:c03300
 WASP ----> S17 PHY *
 : cfg1 0x7 cfg2 0x7114
 eth0: ba:be:fa:ce:08:41
 athrs17_reg_init: complete
 eth0 up
 eth0
 Autobooting in 1 seconds
 ## Booting image at 9f020000 ...
 Uncompressing Kernel Image ... OK
 Starting kernel ...
The output shows the boot loader initialising the serial port. After initialisation the boot loader attempts to auto boot the image at address 0x9F020000. Firstly by uncompressing the kernel image and then starting it. Additional serial output follows before we encounter a raft of file system page read errors before stopping.
 start service
 starting Architecture code for wasp
 [ 1.960000] SQUASHFS error: lzma returned unexpected result 0x1
 [ 1.960000] SQUASHFS error: Unable to read page, block c523, size dd54
 [ 2.030000] SQUASHFS error: lzma returned unexpected result 0x1
 [ 2.030000] SQUASHFS error: Unable to read page, block c523, size dd54
 [ 2.100000] SQUASHFS error: lzma returned unexpected result 0x1
 [ 2.100000] SQUASHFS error: Unable to read page, block c523, size dd54
 [ 2.170000] SQUASHFS error: lzma returned unexpected result 0x1
 [ 2.170000] SQUASHFS error: Unable to read page, block c523, size dd54
 [ 2.240000] SQUASHFS error: lzma returned unexpected result 0x1
 [ 2.240000] SQUASHFS error: Unable to read page, block c523, size dd54
 [ 2.310000] SQUASHFS error: lzma returned unexpected result 0x1
 [ 2.310000] SQUASHFS error: Unable to read page, block c523, size dd54
 [ 2.380000] SQUASHFS error: lzma returned unexpected result 0x1
 [ 2.380000] SQUASHFS error: Unable to read page, block c523, size dd54
 [ 2.450000] SQUASHFS error: lzma returned unexpected result 0x1
So it appears the firmware may have become corrupted. The obvious next step then was to try re-flashing it. After some reading around on the subject (being a complete Linux novice) I discovered the boot loader supports network transfer via the Trivial File Transfer Protocol (TFTP). So it is possible to transfer the firmware image via TFTP and re-flash it.
The first step was to download the required firmware images and other supporting software. I downloaded the DD-WRT firmware image files from here and then downloaded and installed the client side TFTP server program TFTPD32 from here.
The next step was to break execution of the boot loader in order to run tftpboot. To do this, within putty after power cycling, simply wait for the message “Autobooting in 1 second” to appear begin typing “tpl” and pressing enter until the sequence stops and the prompt “db12x>” appears. Once the prompt appeared I ran “tftpboot”. I then made a note of the expected server address “192.168.1.100” and load address “0x81000000”. I then exited tftpboot by pressing Ctrl+C.
 db12x> tftpboot
 dup 1 speed 1000
  Warning: no boot file name; using '6F01A8C0.img'
 Using eth0 device
 TFTP from server 192.168.1.100; our IP address is 192.168.1.111
 Filename '6F01A8C0.img'.
 Load address: 0x81000000
 Log: *
 TFTP error: 'Access violation' (2)
 Starting again
With the router connected directly via an ethernet cable and all wireless adaptors disabled I set the network adaptor to the static IP address “192.168.1.100”. I then ran TFTPD32, browsed for the folder containing the firmware images and set the server address to “192.168.1.100”.
I then ran “tftpboot” again with required load address and source firmware parameters. The new firmware then begun transferring. Upon completion the message “done” appeared and the number of bytes transferred was shown.
 db12x> tftpboot 0x81000000 factory-to-ddwrt.bin
 Using eth0 device
 TFTP from server 192.168.1.100; our IP address is 192.168.1.111
 Filename 'factory-to-ddwrt.bin'.
 Load address: 0x81000000
 Lg: #################################################################
      #################################################################
      #################################################################
      #################################################################
      #################################################################
      #################################################################
      #################################################################
      #################################################################
      #################################################################
      #################################################################
      #################################################################
      #################################################################
      #################################################################
      #################################################################
      #################################################################
      #################################################################
      #################################################################
      #################################################################
      #################################################################
      #################################################################
      #################################################################
      #################################################################
      #################################################################
      #################################################################
      ############################
 done
 Bytes transferred = 8126464 (7c0000 hex)
Before the new firmware image could now be copied the destination flash the destination flash first needed to be erased. The destination address being 0x9F020000 (which we know from the initial captured output) and destination length being the size of the transferred firmware image 0x7C0000 bytes.
 db12x> erase 0x9f020000 +7c0000
 First 0x2 last 0x7d sector size 0x10000                                                                                                 125
 Erased 124 sectors
Once erased the new firmware could then be copied over from the destination flash. Again the destination address being 0x9F020000, the source address being 0x81000000 and the length 0x7C0000 bytes.
 db12x> cp.b 0x81000000 0x9f020000 0x7c0000
 Copy to Flash... write addr: 9f020000
 done
So that all appeared fine all that all that remained was to reboot and hopefully everything would be working.
db12x> reset
Much to my relief that appeared to have fixed the issue. The router now booted fine and I was able to access to the DD-WRT web interface.  I then went ahead and performed a web flash using the web flash firmware image file previously downloaded. I am not entirely sure this stage was necessary but some of the guides I had read previously did and I cant imagine it would do any harm doing so.
So overall a great result. Saved myself some money not having to rush out and buy a new router and learnt a little bit about Linux in the process.
